
Origami Bag
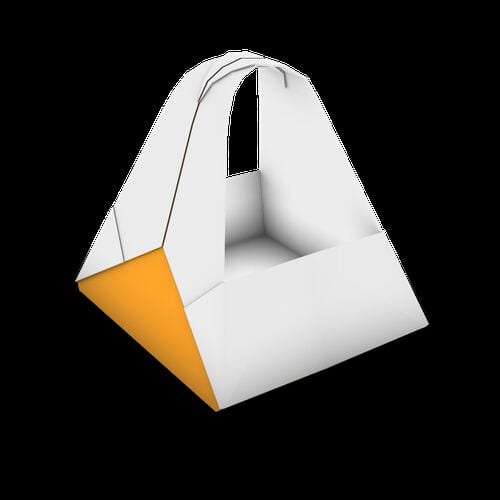
A paper bag that actually opens and has a proper handle is one of the most satisfying things you can make from a single square, and it never fails to get a "wait, that's just paper?" reaction. Because the whole thing collapses flat and then opens out again, it also feels a little like magic the first time you do it.
The trade-off is that this is a long fold rather than a hard one. Roughly the first quarter of the tutorial is spent making creases you will fold away later, and the middle section repeats the same few moves on the second side. Take it slowly, crease sharply, and keep the photos handy — by the time you open the bag out at step 25, everything you did earlier suddenly makes sense.
How to Fold
Step 1. Take a square sheet of paper and fold it in half sideways to make a crease, then unfold.
Step 2. Fold the sheet in half downwards to make a crease, then unfold.

Step 3. Fold along one diagonal to make a crease, then unfold.

Step 4. Fold along the other diagonal to make a crease, then unfold.

Step 5. Turn the paper over.

Step 6. Fold the paper along the creases you have just made, collapsing it into a flat shape.

Step 7. Rotate the model so that the closed point faces upwards.

Step 8. Fold the upper layer of the top part in half downwards to make a crease, then unfold.

Step 9. Fold the upper layer of the top corner down to the centre of the model.

Step 10. Fold the rest of the flap downwards.

Step 11. Turn the model over.
Step 12. Repeat on this side: fold the upper layer of the top part in half downwards to crease it, then unfold.
Step 13. Fold the upper layer of the top corner down to the centre.

STEP 14.
Step 14. Fold the rest of the flap downwards.

Step 15. Fold the upper layer of the left flap across to the right.

Step 16. Turn the model over.

Step 17. Fold the upper layer of the left flap across to the right again.

Step 18. Fold the upper layers of the side corners in to meet the centre line, then unfold.

Step 19. Fold the side corners in again, this time placing their bottom edges along the creases you have just made.

Step 20. Fold the flaps in to meet the centre line.

Step 21. Turn the model over.

Step 22. Fold the side corners in to meet the centre line, then unfold.

Step 23. Fold the side corners in again, placing their bottom edges along the previous creases.

Step 24. Fold the flaps in to meet the centre line.

Step 25. Open the bag out into its three-dimensional shape.

Step 26. Glue the two flaps together as shown to make the handle.

After Folding
Your origami bag is finished. Once the glue has dried, it opens out into a real little paper bag that is perfect for a small gift, a note or a handful of sweets.
Thicker paper gives a sturdier bag, while patterned origami paper makes the handles and gussets stand out. If you would rather not use glue, a dab from a glue stick or a small piece of double-sided tape works just as well.




